¶ Service Ports
All the data that will be shown here are fictitious and used for demonstration purposes only.
¶ What is a Service Port
A “service port” in an OLT (Optical Line Terminal) is a logical or virtual interface used to manage and configure the network services offered to end users in a PON (Passive Optical Network) network.
¶ What is the Service Port for
-
Identifying and Configuring Services:
- The service port identifies different network services (such as internet, IPTV, VoIP) that are provided to end subscribers through the PON network.
- It allows you to configure specific parameters for each service, such as bandwidth, QoS (Quality of Service), and traffic policies.
-
Traffic Segregation:
- It separates and manages traffic from different services, ensuring that each type of service receives appropriate treatment in terms of priority and bandwidth.
- This is crucial for services that require high quality of service, such as video streaming and voice over IP (VoIP).
-
Network Policy Management:
- It allows the implementation of specific network policies for each service, including access control, packet filtering, and rate limiting.
- These policies help ensure network security and efficiency.
-
Monitoring and Diagnostics:
- It facilitates the monitoring and diagnosis of services in real time, allowing network administrators to identify and resolve problems quickly.
- Integrated monitoring tools can provide detailed statistics on the performance of services.
¶ How to use Service Ports?
When an end user connects to the PON network, the OLT associates that connection with a specific service port. This service port is configured with parameters that determine how that user's traffic will be handled. For example, a service port can be configured to:
- High-Speed Internet: Configure high bandwidth, traffic prioritization, and security policies.
- IPTV: Ensure low latency and high priority for video packets.
- VoIP: Configure for minimum latency and jitter for clear call quality.
¶ Service Port creation flow
¶ First, let's navigate to the location that manages the Service Ports.
-
When logging into the system, the first screen we see is the following.
-
Then, in the navigation bar found at the top of the screen, we will select the option Authorized ONUs.
-
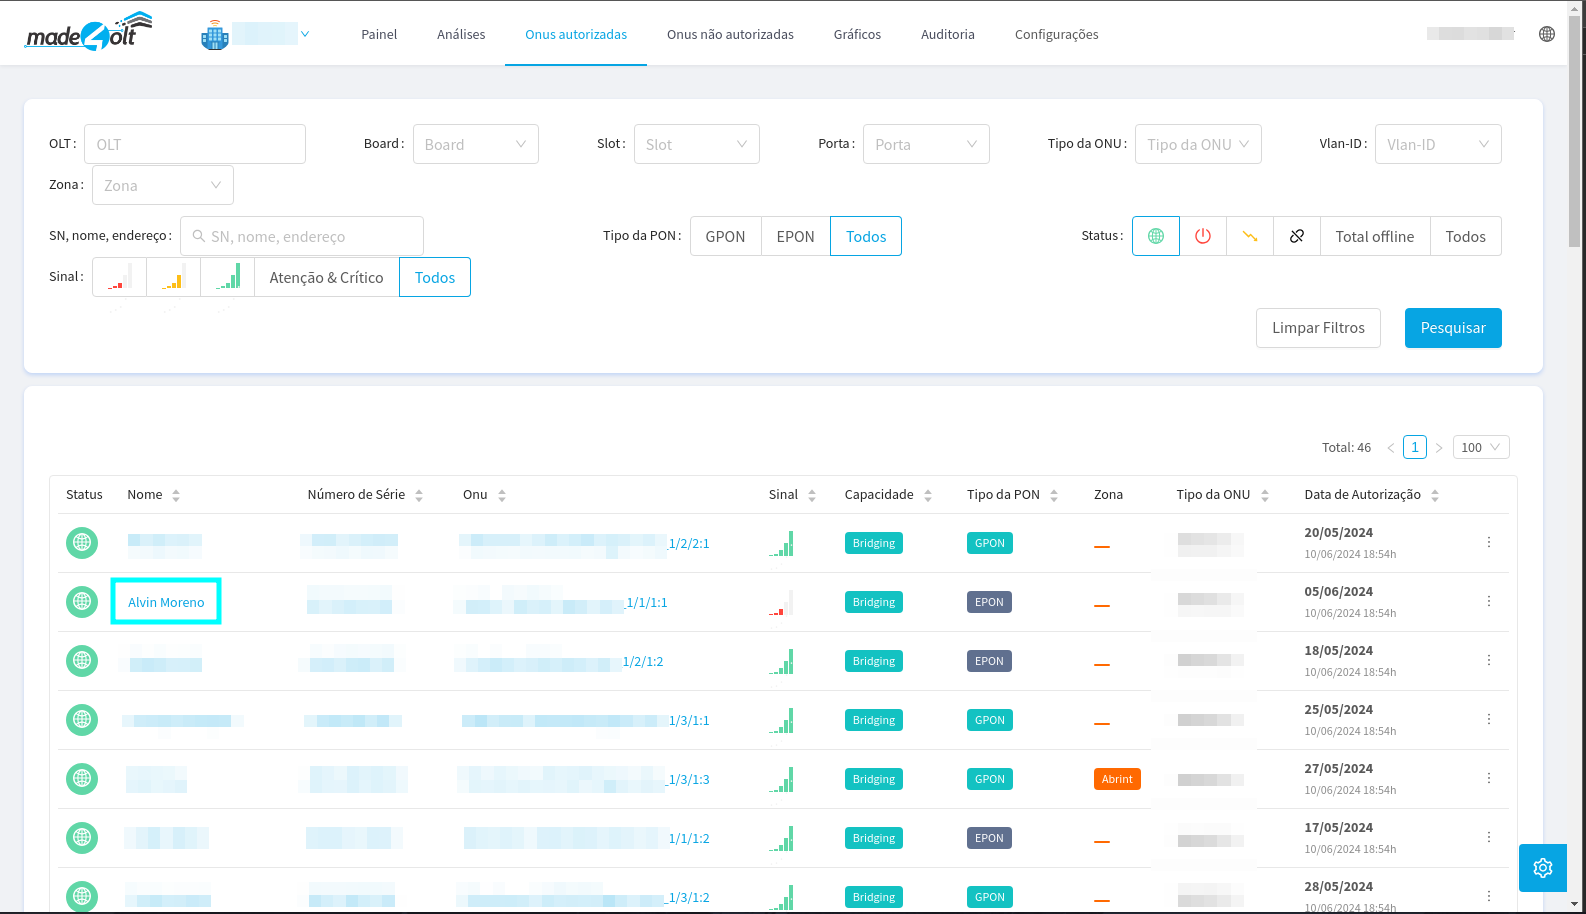
It will redirect the user to the screen where all authorized ONUs are listed.
In this case, we will select the “customer” UN Alvin Moreno.
-
Upon clicking, a side panel will open with information from the selected UN.
Here, we will click on the button highlighted in blue, to begin the process of adding a new Service Port.


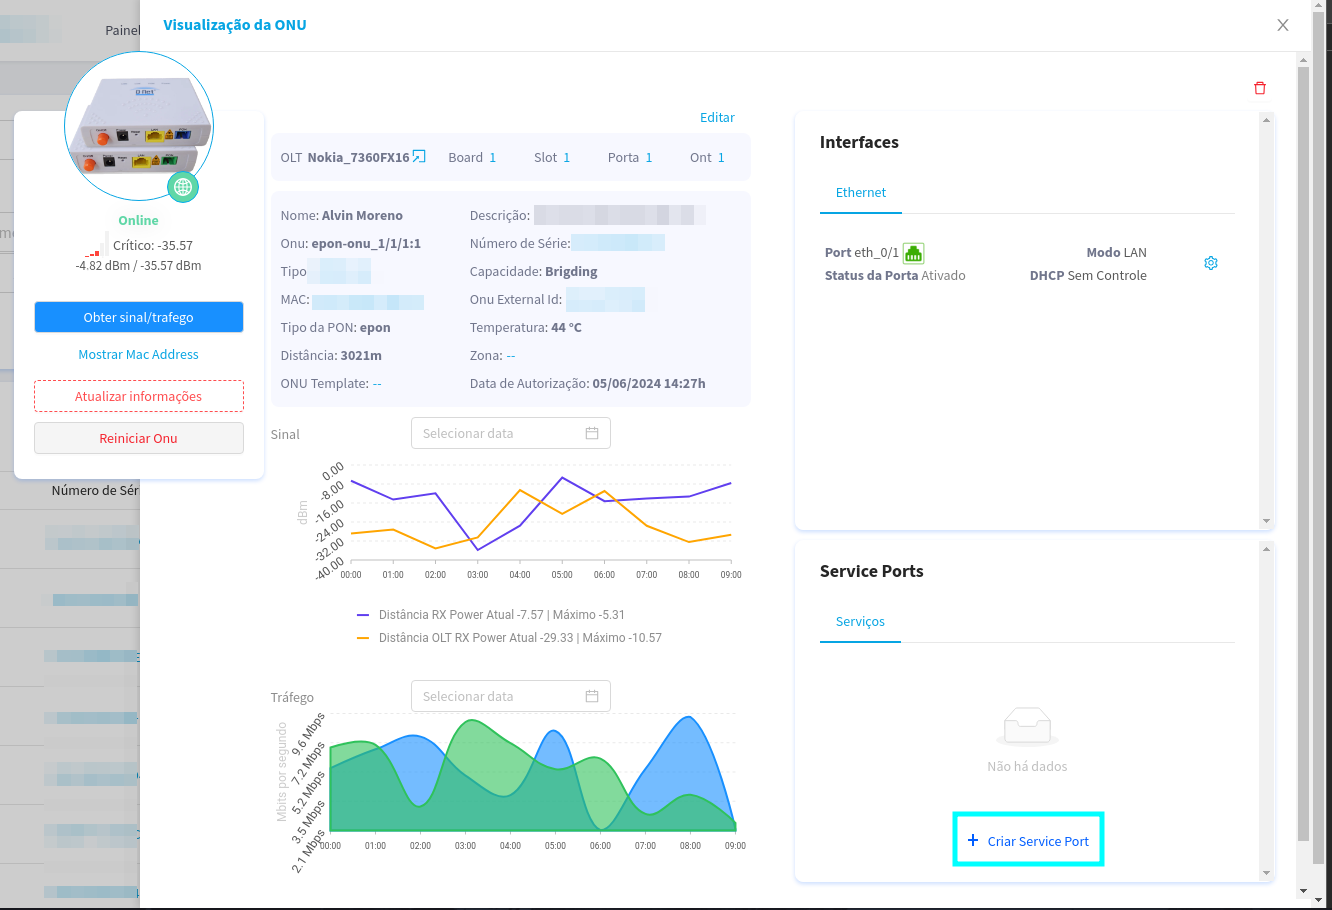
¶ From now on, we can create new Service Ports
¶ Now let's go step by step in the creation process.
- If the information is filled in during the creation of a template, when provisioning an ONU with that template, a service port will be created automatically.
-
When you click on the button highlighted in the image above, a modal will open with the following information
-
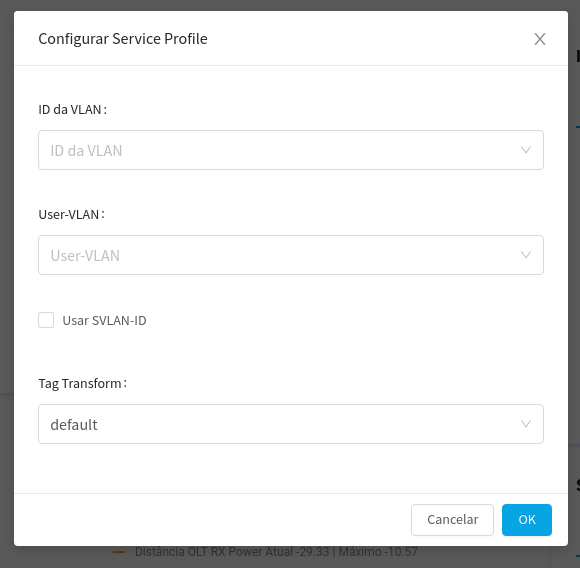
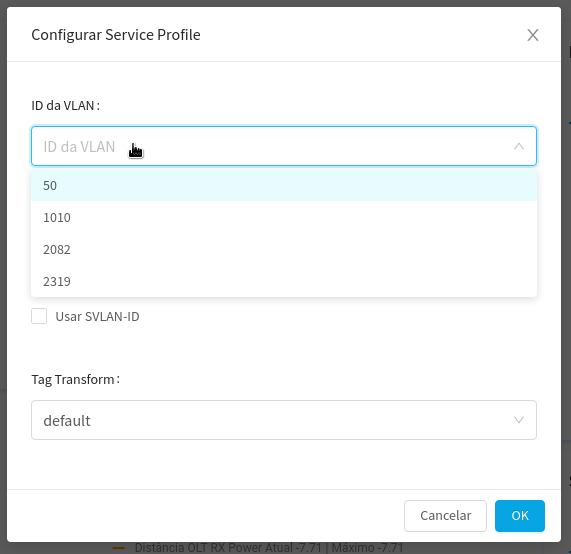
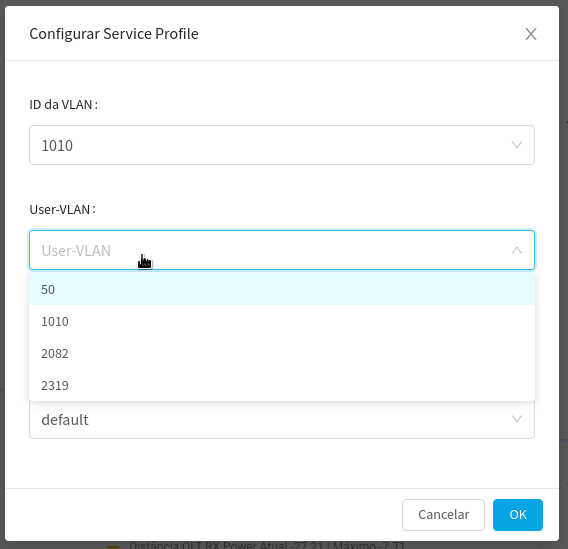
Next, we will select the VLAN to associate with the OLT, commonly associated with a Line Profile.
In this case, let's select VLAN 1010
-
Here, we select the User VLAN, also known as the Costumer VLAN, this is the VLAN that is associated with the client side. In many cases, it's the same VLAN that's associated with the OLT.
In this case, we will also select VLAN 1010
-
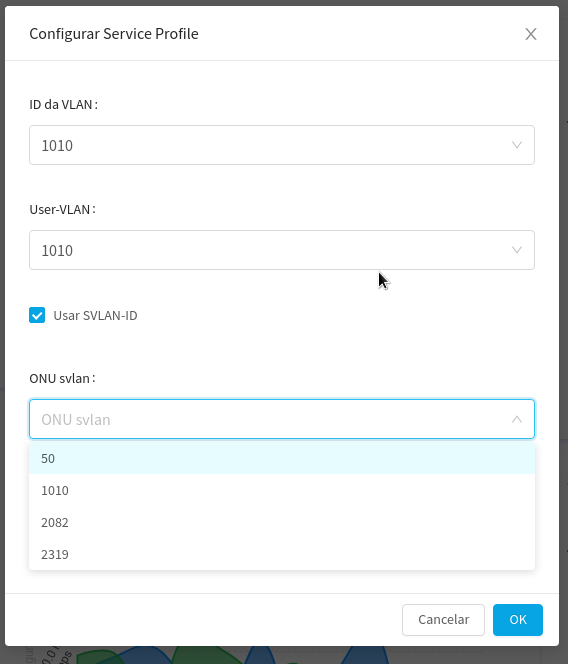
Here, you can select an SVLAN, or Service VLAN, in which case it's a VLAN configured as a specific type of data transport service.
This option is optional, so it's not mandatory.
-
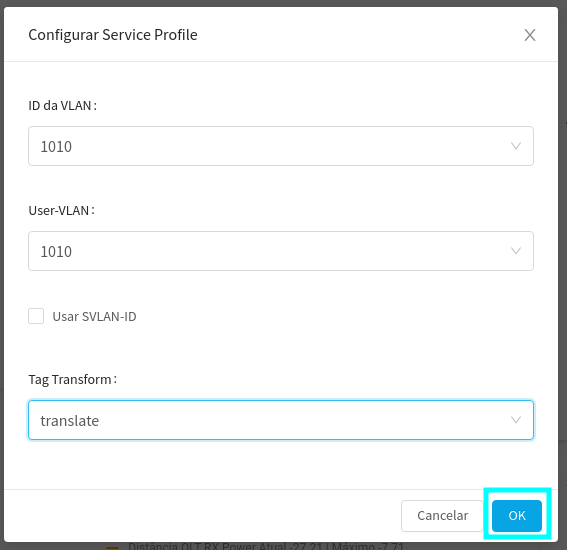
At this time, we can select the Transform Tag, which is responsible for encapsulating data to transmit data from the OLT's internal network to the external Ethernet network.
The most common use of the transform tag is the translate option.
+ Default: - It refers to the default configuration of a device. - Default VLAN (ID 1) is the initial VLAN for all ports on a switch. + Translate: - The process of changing the ID of one VLAN to another. - Used to map different VLANs to different parts of the network. + Translate and Add: - Add a VLAN tag to an unlabeled frame, or add a second tag to an already labeled frame. - Used in Q-in-Q networks to encapsulate client VLANs in provider VLANs. + Transparent: - Device forwards Ethernet frames without changing their VLAN tags. - Typical of switches in bridge or transparent mode. -
After those, we just need to click on the button of OKAY to 'create' the service port.
-
Here, as we can see, the Service port was created, however for it to be used, we need to link it to a Network interface, as we will see in the next steps.

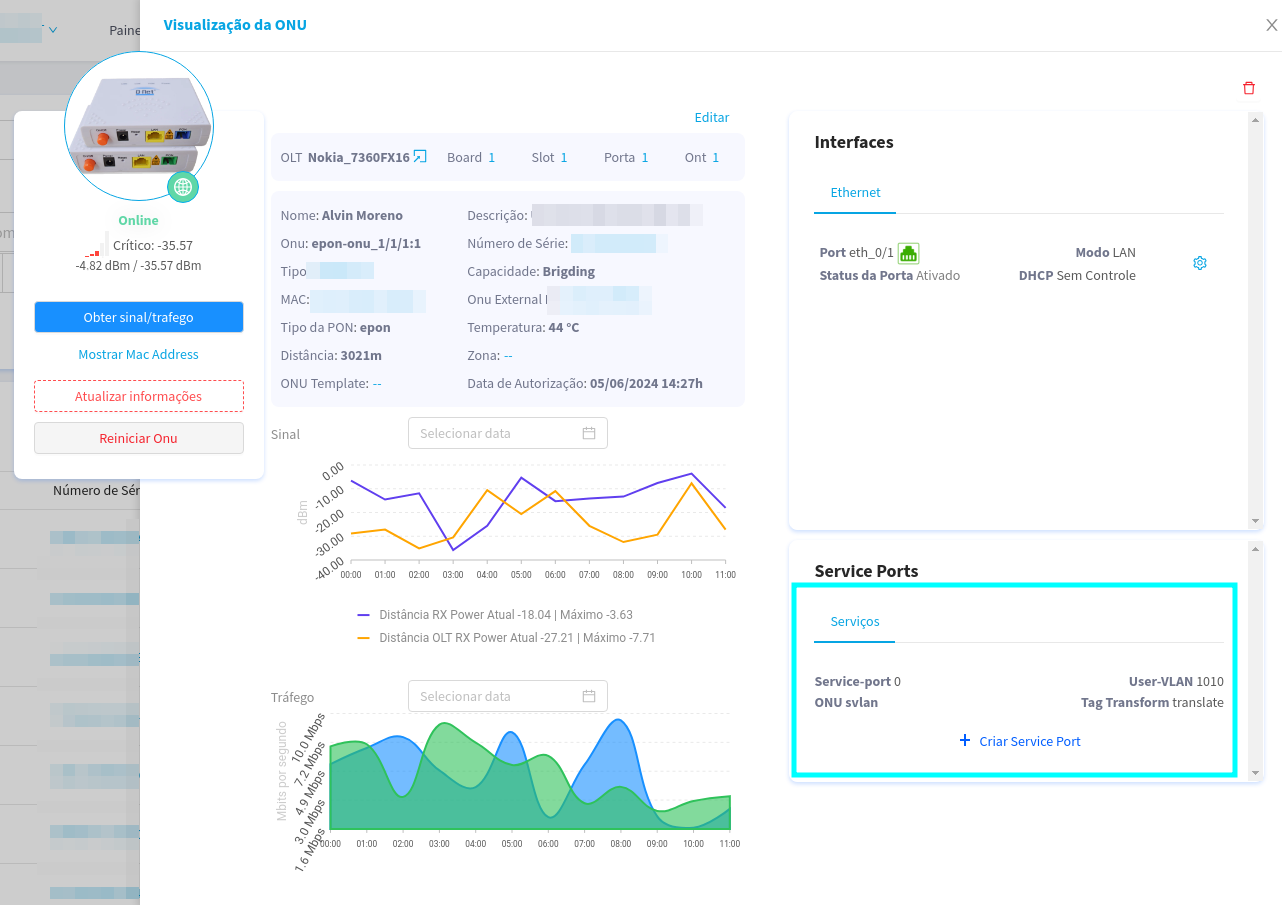
¶ With the Service Port created, we need to link the Service Port to an interface.
-
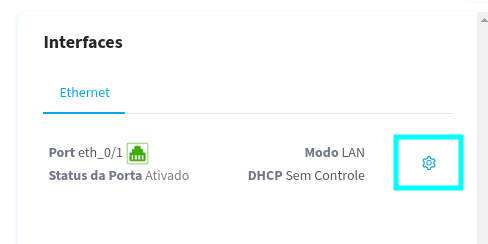
On the screen, we start by clicking on the blue gear, which is next to the eth port, it can be seen that it is in LAN mode.
-
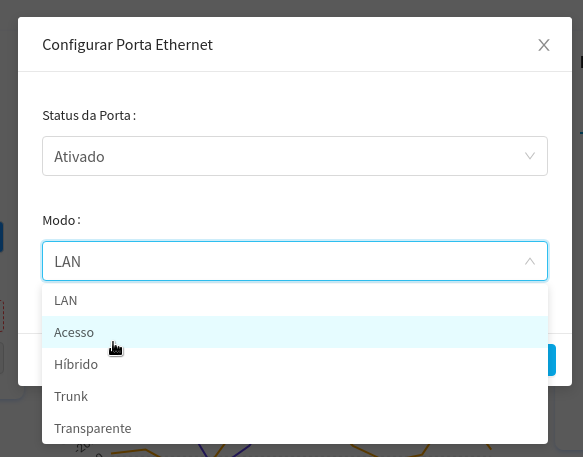
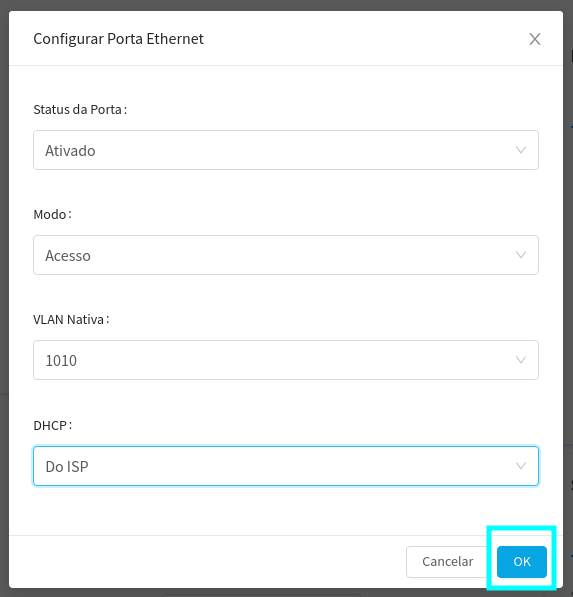
When clicking on the gear, the following modal will open, where we will select the Mode of access for that demonstration.
-
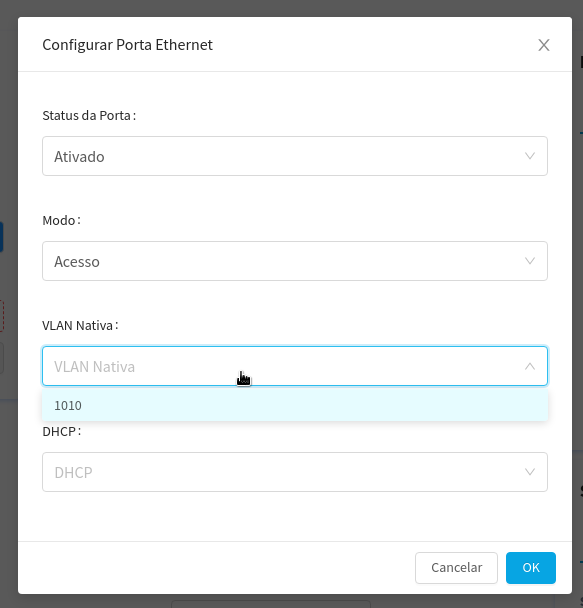
Here, we select the native Access Mode VLAN, notice that there is only one VLAN available. That VLAN is the one associated with the Service Port that we just created!
We select the VLAN and move on to the next step.
-
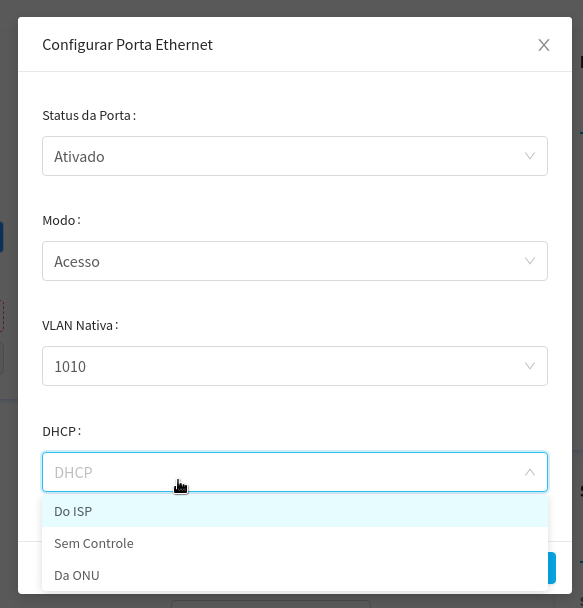
Here we can choose how DHCP will be configured, in this example we will use ISP control
- ISP DHCP refers to the way in which the DHCP server is managed by the internet service provider. In this scenario, the ISP provides IP addresses and other network settings directly to client devices.
-
Operation:
- The ISP has a centralized DHCP server that assigns public or private IP addresses to client devices.
- Client routers or modems generally request an IP address from the ISP's DHCP server.
- The ISP controls all network settings, such as the default gateway, DNS servers, etc.
-
Advantages:
- Simplicity for the customer, as the ISP manages the entire IP allocation.
- Lower need for manual configuration by customers.
-
Disadvantages:
- Dependency on the ISP for network configuration.
- Less control by the customer over the assignment of IP addresses.
- DHCP Without Control
-
Uncontrolled DHCP refers to a network environment where there is no active DHCP server, meaning devices do not receive automatic network settings. Instead, network settings must be assigned manually.
-
Operation:
- Devices on the network don't automatically receive an IP address.
- Each device must be manually configured with a static IP address, subnet mask, gateway, and DNS servers.
-
Advantages:
- Full control over IP address allocation.
- Useful in small networks where the number of devices is manageable.
-
Disadvantages:
- High probability of manual configuration errors.
- Increased administrative effort, especially in larger networks.
-
- DHCP from ONU (Optical Network Unit)
-
UN DHCP refers to the way in which the ONU, which is a device used in fiber optic networks (FTTH - Fiber to the Home), acts as the DHCP server for the customer's local network. In this scenario, the ONU provides IP addresses and other network settings to customer devices.
-
Operation:
- The ONU, provided by the ISP, has an integrated DHCP server.
- It assigns private IP addresses and other network settings to devices connected to it.
- The ONU can be configured to work in conjunction with the ISP's DHCP server or independently for the customer's local network.
-
Advantages:
- Simplification of network configuration for the end customer.
- It allows the ONU to manage the local network, while the ISP manages the fiber optic connection.
- It can offer the customer more control over their local network while maintaining ease of use.
-
Disadvantages:
- If the ONU is not configured correctly, there may be IP conflicts or connectivity issues.
- Lower flexibility compared to networks where the customer can use their own router with DHCP.
-
| DHCP Mode | Network Control | Automatic Configuration | Suitable For|
|---------------------|-------------------------|-------------------------|--------------|
| ISP DHCP | ISP | Yes | End customers who prefer ISP simplicity and management |
| DHCP Without Control | Client | No | Small networks or environments that require full control over IPs |
| UN DHCP | Client (with ISP support) | Yes | Clients using FTTH that need easy configuration and control of the local network |
-
-
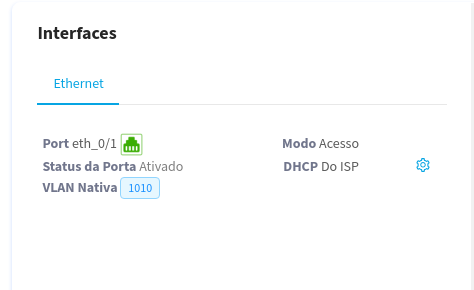
Now, to confirm the link between the Service Port and the interface, it is only necessary to click on the OKAY.
-
Now that the Service Port is linked to an Interface, it's ready to use.
¶ Conclusion
This completes the creation of a Service Port manually.