Prerequisites for implementing TR069
This page will present all the scenarios supported by the Made4it TR069 tool, as well as the limitations of the CWMP protocol (TR069). In case of doubt, regarding the steps described below, it is recommended to read the TR069 manual, which explains in more detail what you can and cannot with regard to the use of the protocol
Manual link here
For the implementation of the TR069 to be carried out correctly and without errors, it is necessary that the steps that are in RED, be observed with the utmost attention, as these are the points that will deliver a perfect functioning of the TR069 in its infrastructure
Do not have NAT and/or DSTNAT between the CPE and the ACS
For communication between the ACS and the CPE to be carried out fluidly and without errors, it is necessary that there is no NAT type between the CPE and the ACS, because the TR069 is strictly designed for point-to-point communication, that is, the communication must not necessarily be on the same network, but it is mandatory that it is not NAT.
If there is a NAT in your network, in the connection of the CPEs, it is necessary to add a rule to the CGNAT, stating that “Any connection that comes from Made4Graph/TR069 to the CPE, and vice versa, that is not NAT”, follows an example:

It should also be taken into account that if there is DSTNAT between the TR069 server and its network, communication failures may occur between the CPEs and the ACS. Therefore, it is recommended that if you wanted to use a DSTNAT, it is necessary to create a second internal interface in the TR069 VM, through which all CWMP communication will take place
Types of adoption of CPEs in TR069
The implementation of TR069 on the network must be done individually on all the CPEs that you wish to place on the made4graph, either through web access, customized firmware, or even through commands delivered via OLT.
Below are the steps that were presented, and their respective peculiarities
Manual setup
In the manual configuration, there is not much secret, you just have to access the CPE, locate the TR069 configuration screen, register the server and wait for it to go up.
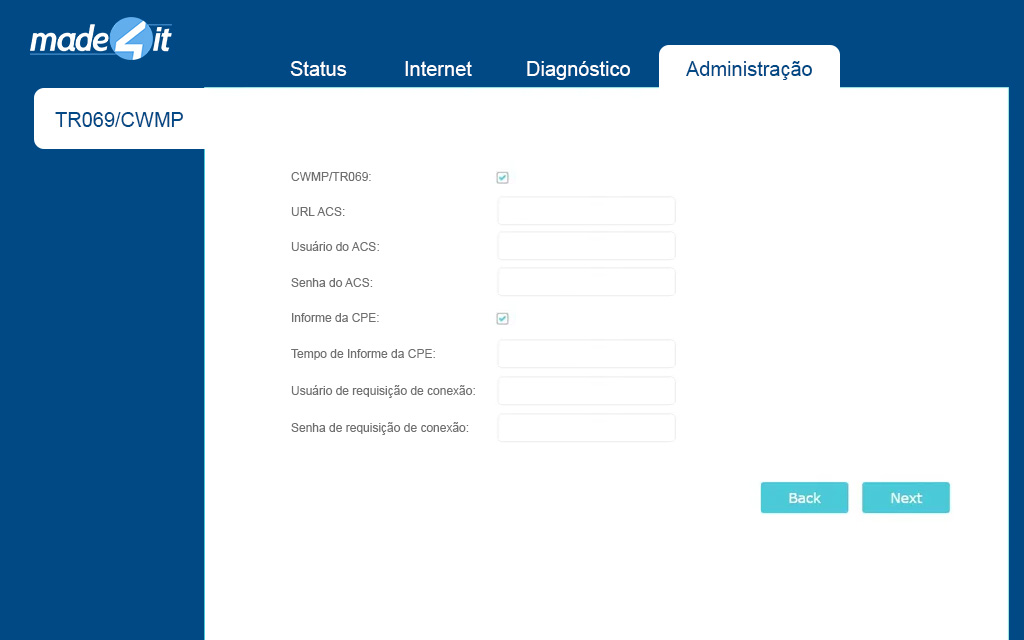
Let's configure the information in each field presented in the image above
CWMP settings:
→The CWMP button must be active
If there is a periodic button or information box, it must be active
→ Information range = 300
→ ACS URL = http://ip_do_server_de_tr:7547
In Huawei CPEs, it is necessary to enter a different, more complex username and password
→ ACS username = admin
→ ACS password = admin
On the equipment you request, on which interface the TR069 communication will take place, select Any WAN
→ Interface used by TR-069 = Any WAN
→ The “Connection Request Authentication” box = must be checked
In the connection request fields, a username and password are requested, and in some models the Way, you must use:
→ User = admin
→ Password = admin
→ Path = /tr069
If a connection port is requested, use 7547
→ Port = 7547
This process must be done on each CPE individually to activate the TR069 module inside it, however, if the CPE is reset, this configuration will be lost and it will be necessary to activate it manually again, because the CPE will return to the factory state, thus losing any settings applied to it, whether WIFI, NETWORK, etc...
Setup via OLT
In the configuration mode via OLT, the ACS authentication parameters (TR069) are delivered to the OLT and sent to the CPE via OMCI,

Below are some examples of configurations in various vendors, which can be used for this purpose.
- OLT DASAN
To create a profile with the name of HGU-TR069, for the TR069, use:
onu-profile HGU-TR069 create3
mgmt-mode mode tr-069
mgmt-mode tr-069 uri http://IP:PORT
mgmt-mode tr-069 access id USERNAME password PASSWD
apply
If you have any questions, use the manual from the manufacturer as a basis for study, or if you prefer, contact us.
- OLT HUAWEI
To create a profile on the Huawei OLT use the commands below
1 - TR 069 Profile configured:
(Password must be a large password)
ont tr069-server-profile add profile-id 11 profile-name "tr069-server-profile_11" url "http://IP_do_tr069:7547/" user "admin" "SENHA" auth-realm "auth"
2 - Ont Line Profile with tr069 enabled:
ont-lineprofile gpon profile-id 1 profile-name "ONT-VLAN1000"
tr069-management enable
tcont 0 dba-profile-id 2
tcont 1 dba-profile-id 10
gem add 1 eth tcont 1
gem mapping 1 0 vlan 1000
commit
quit
3 - tr069 configured on ONT and calling profile-id 11:
ont add 0 2 sn-auth "XXXXXXXXXXXXXX" omci ont-lineprofile-id 1
ont-srvprofile-id 1 desc "DESCRICAO"
ont ipconfig 0 2 pppoe vlan 1000 priority 5 user-account username "testetr069" password "SENHA"
ont tr069-server-config 0 2 profile-id 11
ont internet-config 0 2 ip-index 0
ont wan-config 0 2 ip-index 0 profile-id 1
If you have any questions, use thepage from the manufacturer as a basis for study, or if you prefer, contact us.
- OLT ZTE
To create a ZTE OLT service profile, use the script as an example, but if you have questions, see your OLT manual, or contact the manufacturer, or even contact us
pon-onu-mng gpon-onu_1/2/2:1
tr069-mgmt VEIP-ID acs IP:port validate basic username USERNAME password PASSWD
tr069-mgmt 1 state unlock
- OLT NOKIA
To create a service profile in OLT NOKIA, use the script as an example, but if you have questions, see the manual for your OLT, or contact the manufacturer, or even contact us
- Defines a TR-069 authentication security profile with the name “tr-069".
- Configures the username and password for TR-069 device authentication, where “USERNAME” and “PASSWORD” must be replaced with the actual authentication information.
configure pon
auth-sec-prof 1 name tr-069
user-name USERNAME
password plain:PASSWORD
exit
- Defines a TR-069 URI profile with the name “tr-069" and the IP address and port of the ACS server, where “IP” and “PORT” must be replaced with the actual address of the ACS server.
uri-prof 1 name tr-069
address http://IP:PORT/
exit
- Configures the TR-069 URI profile to use the previously defined TR-069 authentication security profile.
sec-uri-profile 1 name tr-069 uri-prof 1
auth-securi-prof 1
exit
- Configure the TR-069 service for a specific ont (ONT 1/1/1/2/10/10/1) to use the TR-069 authentication security profile defined earlier.
configure tr069serv
ont 1/1/1/2/10/10/1
securi-prof 1
admin-state up
exit
- OLT DATACOM
To create the ACS profile the following commands must be used:
config
profile gpon tr069-acs-profile <ACS_PROFILE_NAME>
url <ACS-URL>
username <ACS-USERNAME>
password <ACS-PASSWORD>
!
commit
Once the ACS profile is defined, it must be applied to the ONUs that must make use of this provisioning method. The following commands exemplify the process of creating a profile for provisioning via TR-069 and applying it to the desired UN (s):
config
profile gpon tr069-acs-profile TR-069
url http://tr-069-server.internal:17000
username datacom
password datacom1234
If in doubt, see the manual for your OLT, or contact manufacturer, or even contact us
Configuration via preset
The customization of the firmware, for your provider, must be done directly with the manufacturer, where they will provide the correct files for your CPE. The use of third-party software or firmware is not encouraged by made4it, since this practice may cause possible problems in the performance of the CPEs.